I have a confession to make. I am crazy about pickles! I can easily polish off a jar without much effort. Several years ago, after my local grocery store stopped selling one of my favorite brands of pickles, I realized how easy it is to make pickles at home. They are so much better than almost anything you can buy in a jar from the store.
I started experimenting and bought several how-to books on pickling and preserving. Next thing I knew, my kitchen was filled with a huge canner and all the canning utensils you could ever want. After trying some of the different recipes, I realized that the best-tasting pickles (in my humble opinion) were refrigerator pickles (not requiring the canning process). This meant that I could make them very quickly, without the anxiety of worrying about the traditional canning process, and they would be ready to eat after only having to wait a week.
The best pickles I ever made were from home-grown pickling cucumbers out of my garden. But those aren’t readily available, so I usually buy them from my local produce store.
I buy about 5 pounds of cucumbers to make a batch of pickles. This makes about 8 – 9 pint-sized jars of pickles. Here is my favorite recipe, loosely adapted from The Joy of Pickling by Linda Ziedrich.
You will need:
8 or 9 pint-sized jars and lids
4 – 5 pounds pickling cucumbers
1 bunch of dill heads or fresh dill
garlic cloves, peeled (1 for each jar)
For the brine:
6 Tablespoons pickling salt
2 quarts water
For the pickling solution:
4 cups water
4 cups cider vinegar
8 teaspoons pickling salt
1 cup sugar
4 teaspoons pickling spices
 Try to get your pickles started as soon as you can after you bring the cucumbers home from the store. They start to degrade very quickly and hate being in plastic (I have found this out the hard way!). Wash them and cut off the blossom ends of the pickles, as it can add bitterness to your pickles (I just cut both ends off since I can never remember which is which!). Cut them lengthwise into quarters. Prepare the brine solution of pickling salt and water. You can usually find pickling salt at the grocery store or a well-stocked hardware store. Place the pickles in a non-reactive bowl (glass, ceramic or stainless steel) and pour the brine over. Place an inverted plate or bowl over them (that will just fit inside the bowl) and let them brine for about 8 – 12 hours.
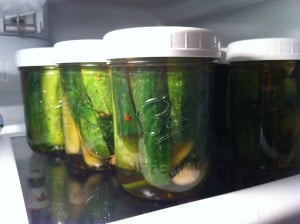
 Place the cucumbers in a colander and rinse them thoroughly in cool water; drain them very well. Prepare your jars. I like to use pint-sized Ball jars and plastic lids because they hold up well over time and can be reused. The metal canning lids tend to rust over time. I bought mine at my local hardware store. Wash the jars and lids in hot, soapy water and rinse well.
Put one peeled garlic clove and a few sprigs of dill in each jar, then pack the jars full with the cucumber spears. Drain any excess water in the jars before adding the pickling solution.
Put the water, vinegar, salt, sugar and spices in a non-reactive pot (hard-anodized aluminum, heat-proof glass or stainless steel). Bring to a boil and stir to dissolve the salt and sugar with a non-reactive spoon. Pour the hot liquid into the jars, filling them to just below the top of the jar. Place jar lids on top, close tightly and let jars cool for a bit. Transfer the jars to your refrigerator and let them sit for a week. They will keep for several months. Enjoy, and stay tuned for The Chopping Block's pickling classes coming up this summer.

What's your favorite food to pickle?


