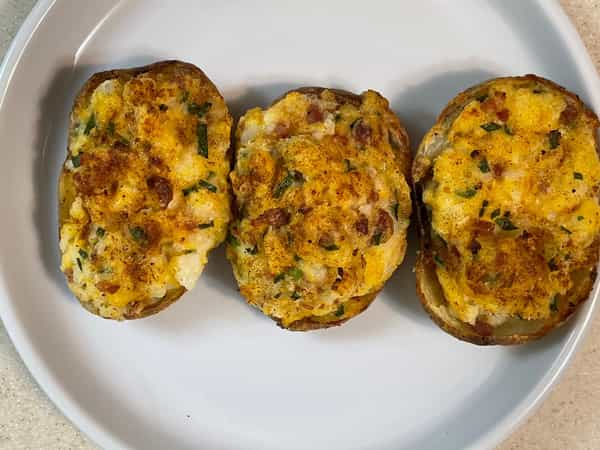
Growing up in the 1980s, one the fanciest side dishes you could get in a restaurant was a double baked potato. Maybe it wasn’t the fanciest but to a little Midwestern picky eater kid, it was the end all be all. I mean, it was mashed potatoes in a potato! It seemed like culinary genius to whip up potatoes and serve them in a potato skin.
I also learned not every double baked potato was created equal. There were some that literally were over processed pasty mashed potatoes piped into a skin. Some would serve their potato vertically which is eye catching but awkward to eat. I also have to give homage to the classic dusting of paprika on top that gained popularity in the 50s and 60s.
The double baked potato did not come cheap if you wanted to substitute it for fries or a baked potato in a restaurant. I can remember being told that for what they charged for a double baked potato that I could buy five pounds of potatoes. (Thanks Grandpa!)
Between that frugal challenge and the fact that I felt there was an overlooked component (the potato skin), I have mastered a potato that has become my go-to standard: the double double baked potato. (I did think of calling it a triple baked potato but no one Googles that!)

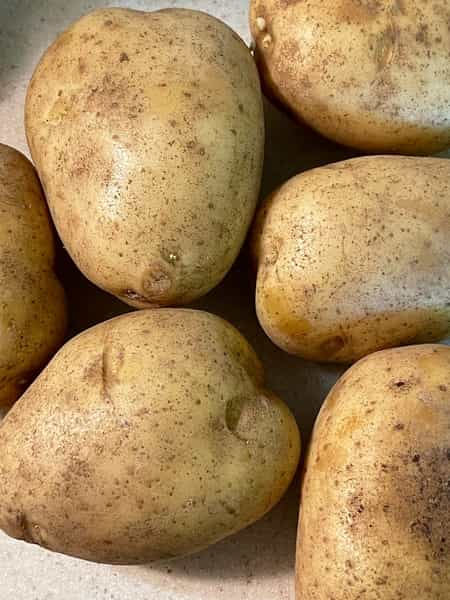
This is the easiest part. You’ve got to have the right potato. A medium (about 8 ounce) russet potato is the best. You want something big enough to have some “guts” but not so big that your skin to mash ratio is uneven. (Just typing that made me realize how seriously I judge people’s potatoes.)
The russet potato bakes up fluffy and dry so you don’t get a watery filling. Plus, the starchiness of a russet is the perfect vehicle to pull in all the “fixings” that go inside when you double baked. (I’ll get to that.)
You want a potato free of marks or eyes and you must give them a good scrub with your vegetable brush. Don’t get overzealous and damage the skin. The debris will come off even with the lightest touch. I like to do a paper towel test after I scrub a potato. If I wipe it with a towel after I scrub it and any “dirt” comes off on the towel, I scrub some more.

Cooking Round 1
If you go online and Google how to bake a potato, you will see dozens of instructions of what works for people. I am not challenging anyone's baked potato nuances. Do what works for you and your oven.
For me, I use a 425-degree preheated oven to start. I place my potatoes on a baking sheet and poke multiple holes to allow steam to escape each potato. I get great pleasure of using a crab leg picker as my weapon of choice. It creates little holes that don’t damage the skin too much. (I probably do 6-8 tiny holes per potato).
*If you are a fan of a salty skin, a little melted butter on the skin and sprinkle of good salt can be done at the halfway mark. I do this on baked potatoes but not necessarily on double baked.
Remove your pan from the oven. When your potatoes are done, they will be hot. Yes, that does need to be noted. The outer skin should have a little wrinkle to it.
Place the potatoes on a cutting board. The sides that were on the pan will be the flattest and most stable. Before you slice into them make sure you roll your potato around on the board. You want to leave that flat part intact. Having these natural flat sides will eliminate a wobble when the skins get filled. The rounder edge will be upwards.
Repeat on all of your potatoes.
Cooking: Round 2
Set your oven to the broil setting with the rack being on one of the top two tiers. (Every oven is different. You don’t want your potato to come in contact with the broiler.)
This is where potato magic happens. All of your skins are cleaned up and most places fill them up again at this point. No!
Brush some melted butter on the inside and sprinkle with salt and pepper.
When your edges start to get brown, remove from oven again. (Resist the urge to cook them longer because they have one more round in the oven.)
While your potatoes are cooking, gather the ingredients you’d like mixed with your potatoes. Classic ingredients are cooked bacon pieces, grated cheddar cheese, green onions and some sour cream.
Now at this point, you have beautiful crispy shells and a yummy filling. You could stop there but hear me out.
Use a scoop and fill all the halves generously with the potato filling. Place back on your pan. Brush the tops with melted butter and a sprinkle of paprika for that nostalgic nod to our potato ancestors.
Serve.
The only difference is in the third cooking round. You’ll heat them up in a 350-degree oven for about 15-20 minutes to get the filling hot enough (about 165 degrees). To keep the crispy integrity, broil them a couple minutes to get the correct crispy texture on the top.
Variations
I think the biggest area of wiggle room is in the fillings. Don’t go crazy and try to overfill with every ingredient in your pantry. Unless you are 12 years old trying to prove a point that “it’ll taste great”, you want to only use a few ingredients.
Don’t try chili (messy), milk (too much like a mashed potato) or too many ingredients.
Classic potato mixtures like broccoli and cheese work beautifully. Leftover taco ingredients mix in nicely as do the meats and cheese remnants from a charcuterie board.
Plain yogurt, cottage cheese or ricotta can easily sub in for sour cream. I’ll even admit that I made it with a little ranch dressing when I was in a Hidden Valley kind of mood. (It happens to all of us.)
If you have a vegan in house, it would be simple to make a batch with vegan meats and cheeses.
And potatoes aren’t just for dinner. Do a recipe mash up (no pun intended) by incorporating my crispy potato shell with this recipe for Breakfast Baked Potatoes.
Now that you’ve got the fancy side dish handled, make sure your steakhouse skills match by joining us during our Hands-on Steakhouse DIY class, Thursday October 19 at 6pm at Lincoln Square.
Double Double Baked Potatoes
Scroll down for a printable version of this recipe
Serves 4, as a light side
Serves 2, as a meal
Serves 1, when I’m sad
Cooking time: 1 hour, 10 minutes
Active time: 20-30 minutes
2 russet potatoes (1 pound total), washed and completely dry
1/2 cup of shredded cheddar cheese
4 slices of bacon, cooked and chopped up, this was about 1/4 cup chopped finely
2 Tablespoons chives, chopped
2 Tablespoons of sour cream
1/4 - 1/3 cup butter, melted
Salt and pepper
Paprika
1. Heat oven to 425 degrees F.
2. Poke holes in potato to allow steam to escape and place on a baking sheet.
3. Set timer for 30 minutes.
4. At the 30-minute mark, remove from oven. Carefully turn the potato over. Optional: Brush with melted butter and sprinkle with salt. Place back in oven and set timer for 30 more minutes.
5. Remove baking sheet from the oven. Potatoes will be hot so use a mitt, tongs or use caution when placing them on your cutting board.
6. Set the oven temperature to the broil setting.
7. Before slicing into the potato, make sure the flat sides are NOT cut into. The flatter sides will be the sides that were on the baking sheet. Turn your potato so the rounder side is upwards. Slice the potato in half lengthwise.
8. Holding the potato halves over a medium bowl, use a fork to release the cooked white potato. Don’t scrape them bare. Leave a potato edge in the skin. Do this for all the potato halves.
9. Place the empty potato skins skin side down on your baking sheet. Brush the inside with butter and season with salt and pepper. Broil in oven for 3-5 minutes. The edges should be crispy. Set aside.
10. In the medium bowl that now contains your potato insides, add the cheese, bacon pieces, chives and sour cream. Mix until ingredients are incorporated. You are NOT trying to achieve a super smooth mashed potato. It will be more rustic. Take a taste. This would be the time to adjust seasoning to your tastes.
11. Divide the contents into 4 and use a scoop or spoon and mound it into each potato. Brush the tops with butter and a sprinkle of paprika.
12, Broil for 5-7 minutes. Tops will be a very light brown and almost a little bit of a crust on top.
Double Double Baked Potatoes
Ingredients
- 2 russet potatoes (1 pound total), washed and completely dry
- 1/2 cup of shredded cheddar cheese
- 4 slices of bacon, cooked and chopped up, this was about 1/4 cup chopped finely
- 2 Tablespoons chives, chopped
- 2 Tablespoons of sour cream
- 1/4 - 1/3 cup butter, melted
- Salt and pepper
- Paprika
Instructions
- Heat oven to 425 degrees F.
- Poke holes in potato to allow steam to escape and place on a baking sheet.
- Set timer for 30 minutes.
- At the 30-minute mark, remove from oven. Carefully turn the potato over. Optional: Brush with melted butter and sprinkle with salt. Place back in oven and set timer for 30 more minutes.
- Remove baking sheet from the oven. Potatoes will be hot so use a mitt, tongs or use caution when placing them on your cutting board.
- Set the oven temperature to the broil setting.
- Before slicing into the potato, make sure the flat sides are NOT cut into. The flatter sides will be the sides that were on the baking sheet. Turn your potato so the rounder side is upwards. Slice the potato in half lengthwise.
- Holding the potato halves over a medium bowl, use a fork to release the cooked white potato. Don’t scrape them bare. Leave a potato edge in the skin. Do this for all the potato halves.
- Place the empty potato skins skin side down on your baking sheet. Brush the inside with butter and season with salt and pepper. Broil in oven for 3-5 minutes. The edges should be crispy. Set aside.
- In the medium bowl that now contains your potato insides, add the cheese, bacon pieces, chives and sour cream. Mix until ingredients are incorporated. You are NOT trying to achieve a super smooth mashed potato. It will be more rustic. Take a taste. This would be the time to adjust seasoning to your tastes.
- Divide the contents into 4 and use a scoop or spoon and mound it into each potato. Brush the tops with butter and a sprinkle of paprika.
- Broil for 5-7 minutes. Tops will be a very light brown and almost a little bit of a crust on top.
