Cooking a steak is one of the most basic skills a cook can learn, and yet it is one that eludes even the best of cooks. Don’t feel bad if you haven’t mastered the art of steak cookery. How many times have you seen steaks sent back because they were not cooked properly while dining in a restaurant? I want to break down the process for you into a few simple steps and offer some tips that should result in very consistent results for you. The principles are the same, whether you are grilling or pan sautéing your steaks.
1. Select a cut
When we refer to a steak, we are implying that the cut of beef we are cooking is a cut that is tender enough to be eaten with fork and knife. You can cook pretty much any cut of beef in the method I am going to outline. However, cuts from the chuck or shoulder of the cow are going to have a lot of sinew and be very chewy, which is why they are best for slow moist heat cooking such as braising.
The steaks I am highlighting here have a good amount of flavor and can be cooked to tender in a short amount of time without marinating or other tenderizing techniques. These are also steak cuts that can be cooked to temperature, meaning the steak can be served at rare or well-done temperatures and still be juicy, tender and flavorful.
Most Common Knife Tender Cuts
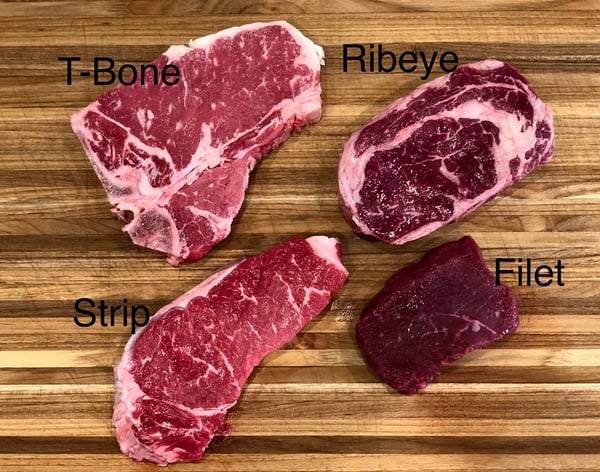
- Beef Tenderloin or Filet of Beef: This is prized as the most tender cut of beef, but it is also the least flavorful cuts due to its lack of marbling.
- Porterhouse and T-Bones: These cuts are one half beef tenderloin and one half sirloin, so you get the best of both worlds.
- New York Strip, Kansas City Strip and Boston Strip: These are all the same cut of sirloin, but have different weights. Strip steaks have more flavor than a beef tenderloin since they have more marbling, and while they are less tender, their texture is still very appealing.
- Ribeye is the same cut as a Prime Rib or Standing Rib Roast; it is just cut into steak. Ribeyes have even more flavor than the strip steaks since they have additional fat and marbling. Their texture is comparable to the strip steak.
2. Precisely heat the surface
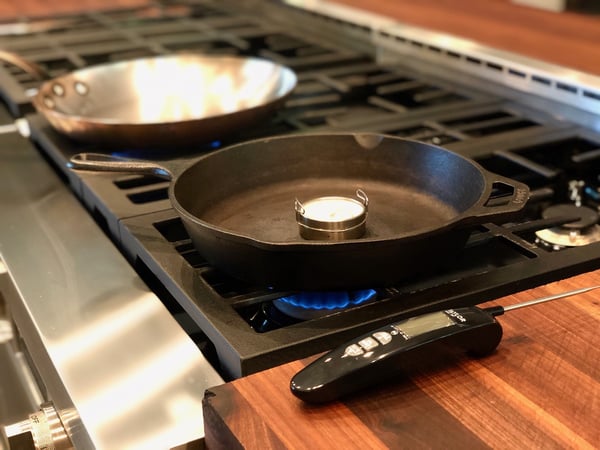
When we cook a knife tender cut of steak, we cook the steak over direct heat. What that means is the steak is directly hitting the cooking surface, as in the case of grilling or pan sautéing. The simplest way to create consistent and predictable results in cooking your steak is to be meticulous about the heat of the surface. I suggest a temperature of 425 for stove top and 450 for the grill. I use a lower temperature inside because the pan and burner give a more controlled and consistent heat source than a grill. The grill's heat source has to contend with opening and closing the lid and wind which fluctuate and can drop the temperature.
When cooking on the stove, use a cast iron pan or heavy-duty skillet. I use a heavy-duty skillet with a non-reactive interior when I am making a pan sauce for my steak and a cast iron skillet when I am not. Cast iron gives an amazing char to the exterior of a steak but the carbon will discolor pan sauces. Whatever pan you are using, put a surface thermometer in the pan and preheat it to the proper temperature of 425.
The thermometer takes longer to register the heat properly than it actually takes for the pan to heat up, but be patient and give yourself a good half hour to preheat the pan. Once you have learned where the setting on your burner is to reach 425 degrees, take note of it. Once you have determined where that setting is on the dial of your stove, you can skip the thermometer. If you want to learn more about using a surface thermometer and properly heating your pan, check out my blog.
3. Season the meat
Season your steaks generously with salt and pepper at least 30 minutes before cooking. The fattier the cut the more salt I use, because salt balances the richness of the fat (think French fries). This draws the seasoning inside of the meat and will provide more flavor. You should check out Samin Nostrat's book Salt Fat Acid Heat on this subject. She has some great information if you want to learn more.
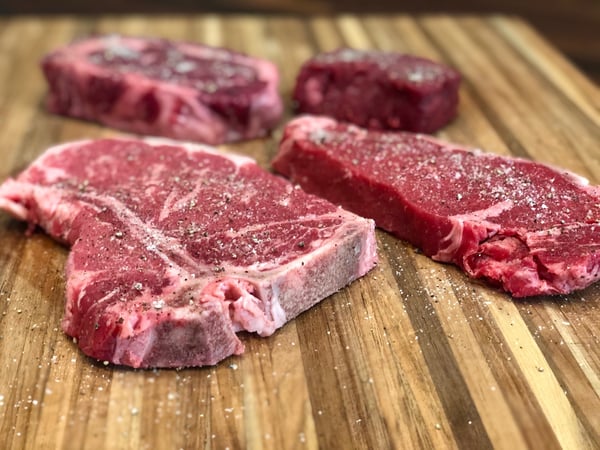
4. Temperature of the meat before cooking
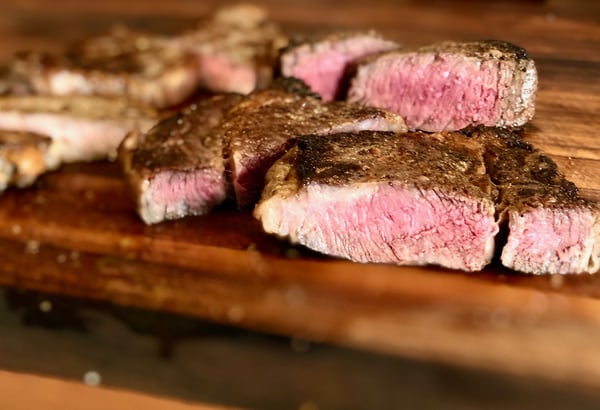
Home cooks have a distinct advantage over restaurants in cooking steaks. At home, we have a controlled environment in which we can bring our meat closer to room temperature before we cook it. In restaurants, it would be to easy for mistakes to happen and safety and sanitation to become an issue. At home, you can safely let your meat rest at room temperature for 30 minutes prior to cooking. When you warm your steak somewhat, the meat will cook more evenly. A properly cooked steak is the same temperature from edge to edge, a rare steak should be brown on the edge and red in the middle.
Did you know that in a restaurant the definition of a rare steak is that it is cold in the middle? You may have a taste for a cold center in your steak; there's nothing wrong with that. A steak with a cold center will be more like sushi, which should be cold. If you are not a sushi eater this might be hard to comprehend, but cold fish isn’t “fishy”, cooked fish is more “fishy.” A rare steak that is cold in the middle will not have the “steaky” flavor that a steak that has been left out for 30 minutes prior to cooking.
I’m not going to get into what internal temperature a steak should be cooked to as that is for you to decide for yourself, but I will say that a steak cooked properly at any temperature will be juicy. The flavor is what changes as you cook the steak longer and a well-done steak tastes more “steaky” than a rare steak. You have to decide for yourself what you like best. For the record, I am a medium rare plus kind of gal.
5. Take the temperature
To tell when the steak (or any meat) is done, all you need is an instant read thermometer. I would suggest investing in one with a very fine tip and rapid read if you can swing the hefty price tag. Even if you just use a regular instant read thermometer, it will give you 100% accurate results. The idea is to take the steak's temperature and then when it is at the temperature you prefer, take notes… how long did it take to cook, what does it look like, what does the steak feel like when it is done. Note these things and then after awhile, you won’t need your thermometer anymore, you will know when your steak is done to your liking.
Temperature Guide
- Rare 120-125: Cool red center
- Medium Rare 130-135: Warm red center
- Medium 140-145: Warm pink center
- Medium Well 150-155: Slightly pink center
- Well Done 160-165: Little or no pink
6. Let the meat rest
The last tip I have for you is to let your meat rest after cooking. Part of the reason that the temperature chart above has a range with each temperature is to factor in your resting time. If you take your steak off at 120 degrees and let it rest for 3 to 5 minutes the temperature will rise anywhere from 2 to 5 degrees. You will want to factor that into your cooking time as you’re learning what temperature you want to remove the steak from the cooking surface.
The reason that we let the meat rest is not related to the temperature rising after you remove the heat source, it is because it will make your steak juicier. If you have cooked your steak to rare and put it on your plate and cut right into it, all the blood and juices will run out onto your plate. If you let the meat rest, those juices settle into the steak and stay there. You will have a much juicier steak if you let it rest for a few minutes before you cut into it.
I hope you enjoyed these simple tips for cooking a steak with accuracy. If you want to learn how to make a perfectly cooked steak indoors, you won't want to miss our virtual class coming up next month: Date Night Cook Along: Steak au Poivre. Stay tuned for that class coming soon as well as more August classes on our class calendar.
If you want to perfect steak on the grill, join us for Grilling Boot Camp this Saturday, July 18 from 10am-4:30pm. This is a hands-on class on our outdoor grilling patio at Lincoln Square where you will make Spice-Rubbed Ribeyes with Smoked Tomato-Chili Sauce among many other delicious grilled dishes! If you can't join us this Saturday, this class will also be held next month on Saturday, August 15.
We are slowly and safely returning to small, socially-distanced classes at our Lincoln Square location, so check out our class calendar if you are ready to get cooking in person. If not, our virtual classes will continue to get you cooking at home! You can see both options on our class calendar.


