If you have you never tasted a butternut squash pie, it might be hard to imagine that it is even better than a pumpkin pie. I am not saying that pumpkin pie isn’t delicious, and I know it is something many people look forward to having it on Thanksgiving. In fact, you may have been waiting to enjoy that one single slice for the entire year!

If your Aunt Betty will cry herself to sleep without her whipped cream laden, cool and creamy pumpkin pie, by all means serve it. You can always order The Chopping Block’s well-loved pumpkin pie; our pies are handmade at every step so you never need to feel like you are skimping on a store-bought pie. Ordering one simply gives you a little extra time to try a new and exciting recipe this Thanksgiving, like this butternut squash pie.

I stumbled upon butternut squash pie quite by accident. I was going through a breakup 25 years ago, and being the great mother that she was, my mom drove up from Iowa as a show of emotional support. I was thrilled to see her and to have her company at that difficult time, but I was shocked to see her gift. As most mothers are inclined to do when their children are sad, they want to feed you. My mother’s idea of feeding me was to bring me an entire case of sweet corn and two of the biggest butternut squashes I had ever seen. Now being single I thought, how on earth will I ever consume all this food?
I really can’t recall what I did with all that corn, but I do remember what I did with at least some of the squash: I made butternut squash pie for Thanksgiving. I remember my mother telling me stories about the year we had a bumper crop of butternut squash on our acreage. She canned a ton of butternut squash that year not knowing what she would do with it all. When the holidays came around, she thought she would use it instead of pumpkin for her holiday pies. She never told anyone what she had done, and no one could tell it wasn’t pumpkin. They even said it was the best pumpkin pie they ever had! I took that giant butternut squash my mother brought me, channeled her and made butternut squash pie that year. Just as she had said, everyone thought it was the best “pumpkin” pie they had ever had. Butternut squash has a similarly light texture to pumpkin but is packed with a lot more flavor.

Gluten-Free and Dairy-Free Option
If you are looking for an easy gluten-free pie option, butternut squash pies have a slightly denser texture than pumpkin pie which makes it a great candidate for a crustless pie. The butternut squash pie filling recipe has some flour added to it but this can easily be omitted. The flour’s role in the filling is to keep it from cracking and a little cracking is really no big deal so you can leave out the flour in this recipe to make it gluten-free.
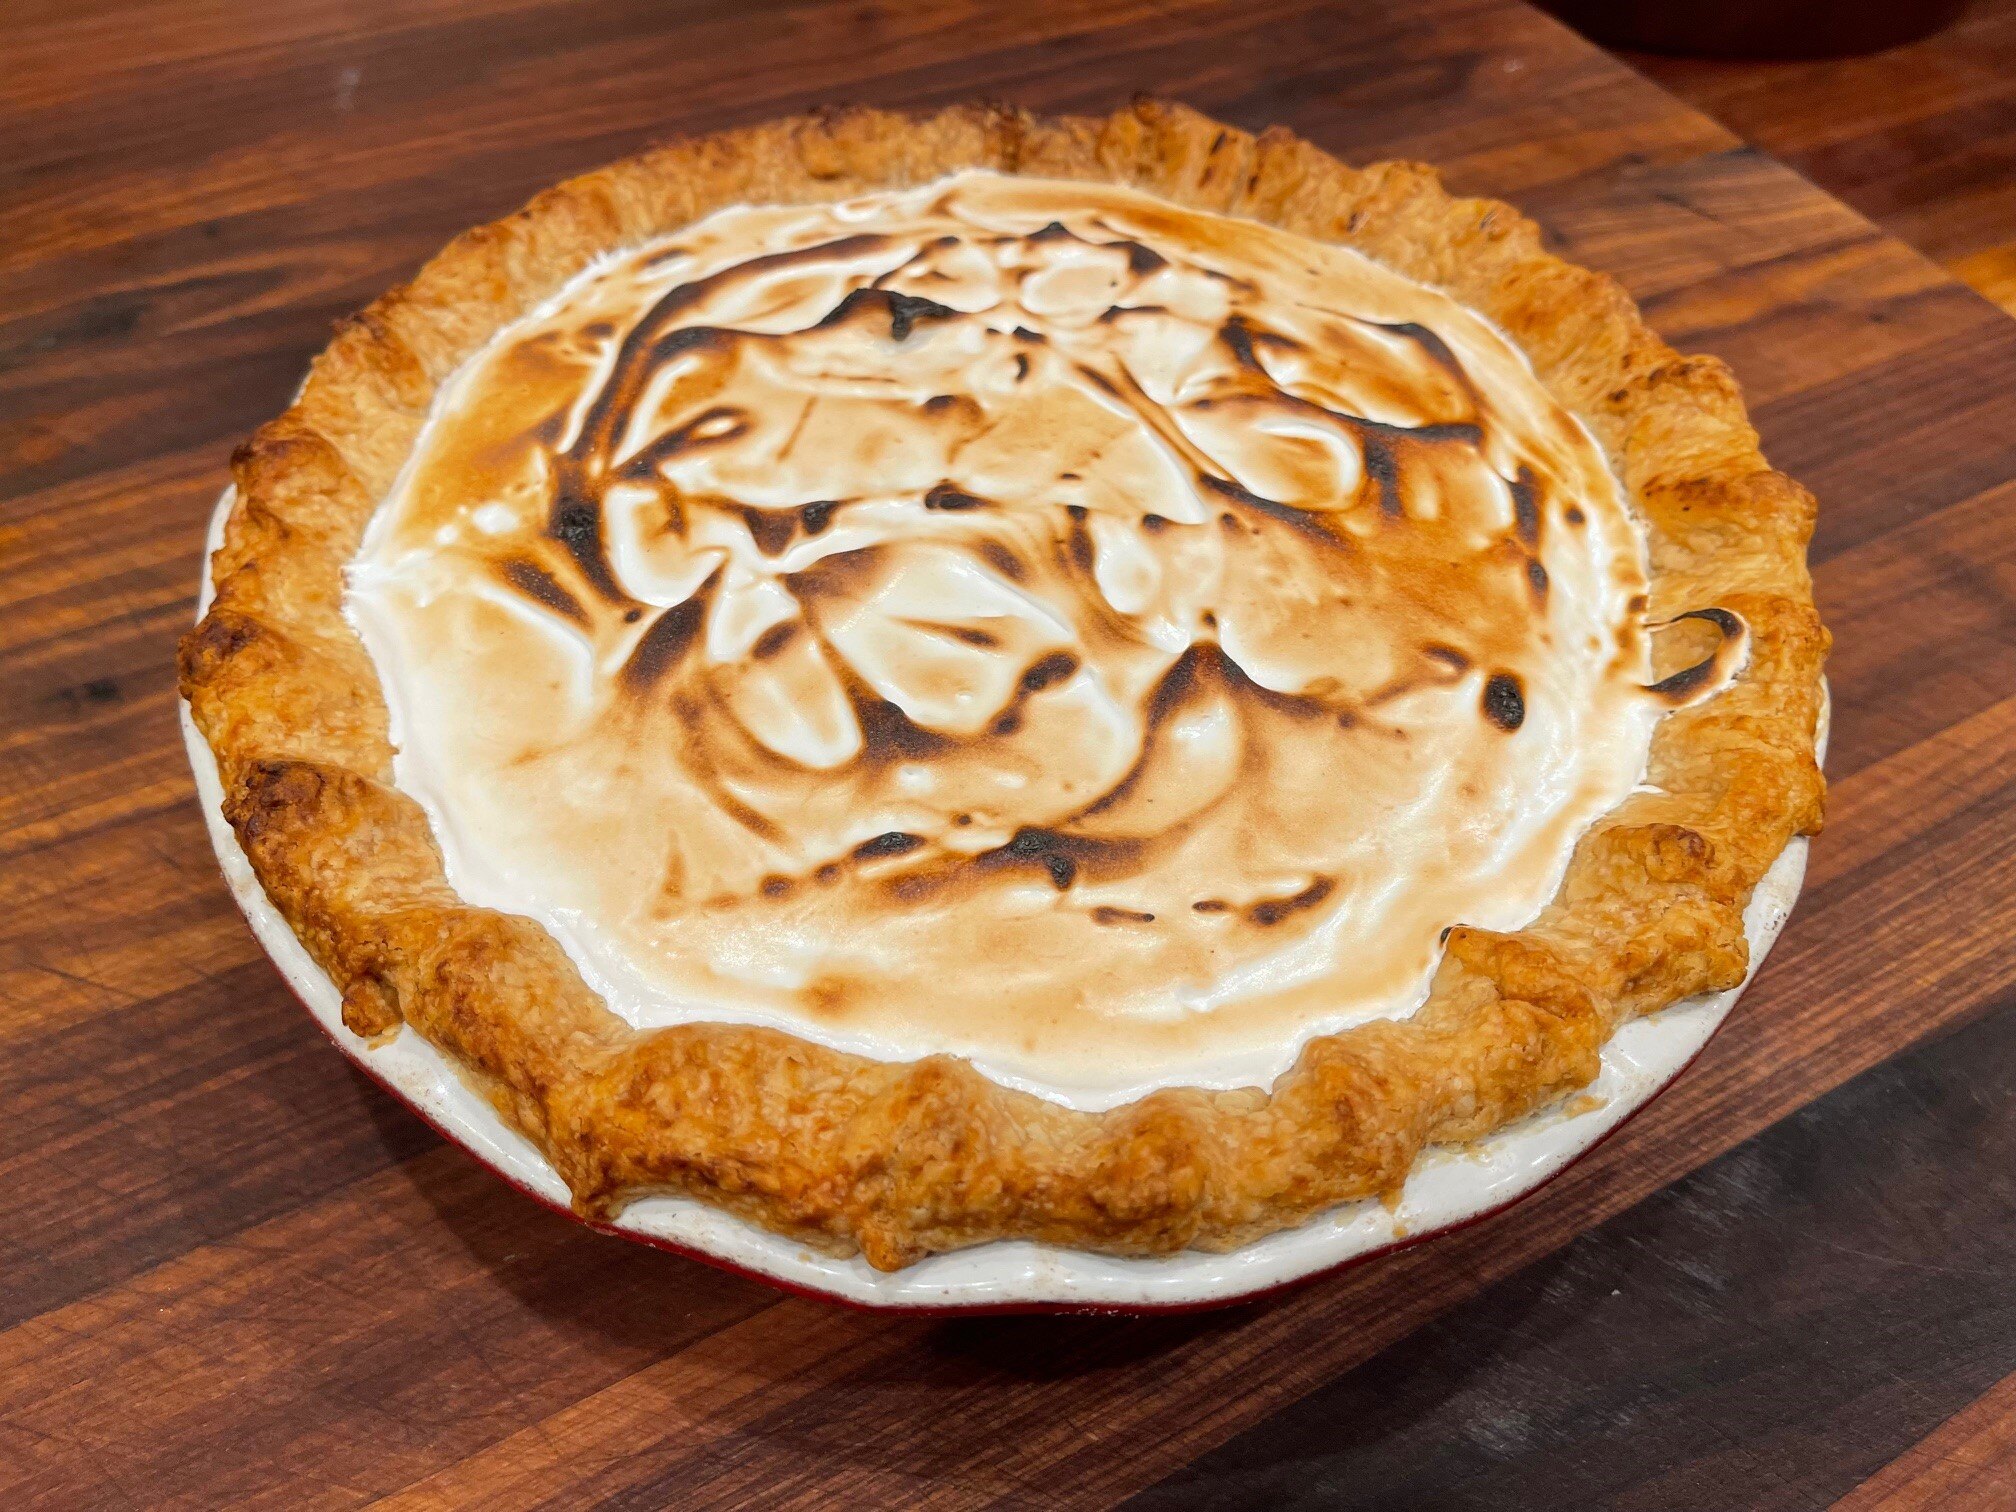
In this recipe, I have topped the pie with a homemade marshmallow topping as a fun new take, this step can easily be eliminated if you want to make the preparation a little easier but the marshmallow topping is a dairy free option for our non-dairy loving friends.
This recipe includes the crust, but again, just omit that and the flour in the filling to make this dish gluten-free.

Butternut Squash Pie
Yield: 1 pie, serves 8
Prep time: 1 hour
Bake/cook time: 2 hours, 30 minutes
Inactive time: 24 hours (for pie crust to rest)
Total time: 27 hours, 30 minutes
For the filling:
15 ounces butternut squash, roasted
2 Tablespoons granulated sugar
1/2 cup light brown sugar, packed
2 eggs
2 Tablespoons flour
12 ounces evaporated milk
2 Tablespoon crystalized ginger, minced
1 1/2 teaspoons cinnamon, ground
1/4 teaspoon nutmeg, grated
1/4 teaspoon salt
For the pie crust:
2 cups all-purpose flour
1 1/2 sticks unsalted butter, cold cut in 6 pieces
1/4 cup shortening, cold
2 Tablespoons sugar
Pinch of salt
1/3 cup very cold water
For the topping:
4 egg whites, room temperature
1/2 teaspoon cream of tartar
1 cup granulated sugar
1 cup light corn syrup
1/3 cup water
2 teaspoons vanilla
Step 1: Make the Pie Crust
 Make the pie crust 24 hours in advance and chill. You will use half of the crust recipe for the butternut squash pie. Freeze the other half of the dough recipe for up to six months.
As I mentioned earlier, this pie can be made without any crust so you can skip this step all together if you choose. If you do choose to make your pie with crust, watch my tutorial video.
For more pie crust tips, check out my previous post The Anatomy of Pie Crust.
Step 2: Roast the Butternut Squash Pie
 Cut the squash in half lengthwise and scoop out the seeds with a spoon and discard. A light brushing of grapeseed or vegetable oil on the flesh helps to keep it from drying out. I like to rub the oil on the flesh with my hands and place it flesh side up on a parchment lined baking sheet. Bake in a 350-degree oven until tender and soft, between an hour and hour and half, depending on the size of the squash. Let the squash cool completely and scoop out the flesh, discarding the skin and any over brown or hard pieces of flesh. If you do not have a scale, 15 ounces is approximately 2 1/2 cups of cooked squash.

- When I roast squash for other purposes, I put the flesh side down on the pan so that the flesh browns and caramelizes, I’m not looking for too much browning in this recipe so I put it on the pan flesh side up.
- Freeze or refrigerate extra squash and enjoy it as a side dish or for a future pie.
 Step 3: Make Pie Filling
 After roasting the squash, the rest of the filling comes together in minutes. Simply take all the filling ingredients and put them in a blender or you can use an immersion blender to puree all the ingredients and break down any squash fibers. Pulse the blender until the filling is completely smooth and combined.
 Step 4: Roll Pie Crust
 You will use just half the crust from the recipe. Roll out half of the pie crust and freeze the other half.
Step 5: Fill Crust and Bake
 Pour the squash filling in the pie crust and place on a parchment lined baking sheet. Bake at 400 degrees for 15 minutes and reduce heat to 350 and bake for 30 to 40 minutes, just until the center is set and not wobbly. If you are not sure, take the pie out at 40 minutes… it will be done, let the pie cool completely before moving on to the next step.
 You can make the pie the day before serving, just cover and refrigerate after the pie has cooled to room temperature. Do not put the pie in the refrigerator until it has cooled to room temperature, the pie will get a lot of condensation on the surface if you refrigerate it when it is too warm.
*You will top the pie with marshmallow topping a few hours before serving.
Step 6: Make Marshmallow Fluff
The secret to a good fluffy marshmallow fluff is cream of tartar for stability, room temperature egg whites for volume and the right ratio of sugar syrup to egg white for density. Follow this recipe and you should be good to go. Clean all equipment and make sure there is absolutely no egg yolk in the whites; fat prevents egg whites from achieving stiff peaks.
*You will need a candy thermometer and stand mixer for this recipe. It can be done with a hand mixer but you will need to have an assistant to pour the hot syrup into the egg whites. It is far too dangerous to try and hold a hand mixer and pour a tiny stream of dangerously hot syrup at the same time.
Separate the eggs carefully, freeze yolks for some other yummy recipe. I like to separate the eggs cold and then let the whites reach room temperature. The yolks will remain fresher this way.
Set up your stand mixer and have the cream of tartar and vanilla at the ready.
 Place corn syrup, sugar and water in a small sauce pan. Turn the heat on medium high and stir the mixture until it comes to a boil and the sugar has dissolved. Turn the heat down to medium and stop stirring the syrup at this time so that it does not crystalize. Place the candy thermometer in the pan and cook until it reaches soft ball stage or 240 degrees. Remove the thermometer and slide the pan off the hot burner onto a cool one so it doesn’t keep cooking.
Turn on the stand mixer and add the egg whites and cream of tartar. Turn the mixer on high until the egg whites form soft peaks.
Drizzle the sugar syrup into the eggs in a very thin stream over a low speed. Once all the sugar syrup is added turn the mixer up to medium high and mix for another 7 to 8 minutes, until very stiff and fluffy. Turn off the mixer and add the vanilla, mix until combined. The marshmallow fluff can be made a day in advance but it will lose some volume.
 Step 7: Top the Pie
If you are using marshmallow fluff, it's best to top the pie just a few hours before serving so it keeps its volume. To top the pie, make sure the surface of the pie is dry, so if some moisture has collected on the surface, take a clean paper towel and lightly pat to absorb the moisture off the surface of the pie. Place some large dollops of fluff on the surface and spread around with the back of a tablespoon to create fluffy peaks.

If you have a blowtorch, you can go over the surface of the pie very lightly with just the tip of the flame of the blowtorch to brown the surface. Alternatively, you can bake at 450 degrees for 10 minutes in the oven.

 I hope you enjoy this new idea for a holiday pie, and please let me know in the comments if your guests think this is in fact better than pumpkin pie!
If you are looking for new ideas for the holidays, we have many seasonal class offerings coming up:
- Hands-On Fabulous Fall Baking Friday, November 22 11am
- Hands-On Pie & Tart Boot Camp: Holiday Edition Saturday, November 23 10am
- Hands-On Things to Bring: Delicious Side Dishes for Holiday Gatherings Sunday, December 15 11am
- Hands-On Holiday Treats Friday, December 20 10am OR Saturday, December 21 10am
- Hands-On Holiday Cocktails Friday, December 20 6pm
- and so many more!
And if you would like our chefs to handle dessert for you, you still have time to order holiday pies. Choose from our classic pumpkin pie or our famous apple pie and pick up on either Tuesday or Wednesday before Thanksgiving.
Butternut Squash Pie
Ingredients
- 15 ounces butternut squash, roasted
- 2 Tablespoons granulated sugar
- 1/2 cup light brown sugar, packed
- 2 eggs
- 2 Tablespoons flour
- 12 ounces evaporated milk
- 2 Tablespoon crystalized ginger, minced
- 1 1/2 teaspoons cinnamon, ground
- 1/4 teaspoon nutmeg, grated
- 1/4 teaspoon salt
- 1/2 recipe TCB's Pie and Tart Dough
- 4 egg whites, room temperature
- 1/2 teaspoon cream of tartar
- 1 cup granulated sugar
- 1 cup light corn syrup
- 1/3 cup water
- 2 teaspoons vanilla
Instructions
- Make the pie crust 24 hours in advance and chill.
- Cut the butternut squash in half lengthwise and scoop out the seeds with a spoon and discard. Brush a light coating of grapeseed or vegetable oil on the squash and place it flesh side up on a parchment lined baking sheet. Bake in a 350-degree oven until tender and soft, between an hour and hour and half, depending on the size of the squash. Let the squash cool completely and scoop out the flesh, discarding the skin and any over brown or hard pieces of flesh.
- Put all filling ingredients in a blender (or use an immersion blender) and puree all the ingredients. Pulse the blender until the filling is completely smooth and combined.
- Roll out half of the pie crust and freeze the other half.
- Pour the squash filling in the pie crust and place on a parchment lined baking sheet. Bake at 400 degrees for 15 minutes and reduce heat to 350 and bake for 30 to 40 minutes, just until the center is set and not wobbly. Cool completely.
- Separate the eggs.
- Set up a stand mixer and have the cream of tartar and vanilla at the ready.
- Place corn syrup, sugar and water in a small sauce pan. Turn the heat on medium high and stir the mixture until it comes to a boil and the sugar has dissolved. Turn the heat down to medium and stop stirring the syrup at this time so that it does not crystalize. Place the candy thermometer in the pan and cook until it reaches soft ball stage or 240 degrees. Remove the thermometer and slide the pan off the hot burner onto a cool one so it doesn’t keep cooking.
- Turn on the stand mixer and add the egg whites and cream of tartar. Turn the mixer on high until the egg whites form soft peaks.
- Drizzle the sugar syrup into the eggs in a very thin stream over a low speed. Once all the sugar syrup is added, turn the mixer up to medium high and mix for another 7 to 8 minutes, until very stiff and fluffy. Turn off the mixer and add the vanilla, mix until combined.
- Top the top of pie with the marshmallow fluff a few hours before serving.
- If you have a blowtorch, you can go over the surface of the pie very lightly with just the tip of the flame of the blowtorch to brown the surface. Alternatively, you can bake at 450 degrees for 10 minutes in the oven.
