Over the past month, my one-year-old daughter Willa has become increasing obsessed with pumpkins, ghosts, skeletons, and fall leaves. Before the autumn season, anything that resembled an apple whether vegetable or fruit was just an “apple” to her. We live near a community garden so we were working on her produce knowledge up until the end of the season when she started to see the squash growing and small pumpkins at the stores and on the neighbor’s porches. After a trip to the pumpkin patch, Jack o’ Lanterns and pumpkins have become the craze.
 We drew pumpkins, watched them on TV, and even bought pumpkin clothes. We did some carving, dissecting, and smashing of pumpkins as well.
 When she tried to eat some raw pumpkin, I told her “We have to cook it” which is when she exclaimed “Cook a pumpkin, what!?" At this point, I assume her general understanding of “cook” is me playing on the stove then us sitting down and eating food and at this point the only thing we hadn’t done with a pumpkin was cut it up and eat it. So, that’s just what we did.

 If you’ve yet to cook your own pumpkin, I do recommend it over the canned stuff for a few reasons but first, you have to pick the right ones to cook with. The small “Sweet” or “Pie” pumpkins are the go-to option, you may also see Cinderella or Autumn pumpkins. Theses gourds are specifically grown for consumption and have a sweeter flavor, smoother flesh, are generally less starchy, and have a lower moisture content.
Larger carving pumpkins can be bland in flavor and have stringy flesh. You can still eat these large pumpkins, but they aren’t very appetizing. Once you’ve got the right pumpkin, it's as simple as preparing any other variety of winter squash. In fact if you can only find carving pumpkins, I would sooner use a honeynut or butternut squash.
I like using fresh cooked pumpkin over canned pumpkin for the same reasons I prefer any fresh food over canned food! I like the natural texture, I can season and cook the food to my liking or use, and I know the process and ingredients in which it was made. Canned pumpkin is great for out of season cooking and saves time, but I’m not a fan of the texture or additional processing.
Fresh vs Canned

Fresh vs Canned Pumpkin
The uses are endless once you have your cooked pumpkin: pastas, pies, ice cream, or breads. I made risotto and an awesome pumpkin bar as well as keeping some plain seasoned pumpkin as a side for Willa’s dinners. It freezes easily too, so you can avoid buying the canned stuff all year! I’ve included my pumpkin bar recipe for you to try. You can also check out our upcoming Thanksgiving classes this month for more ideas on how to utilize your fresh seasonal ingredients!

Ginger Cookie Crust Pumpkin Bars
Scroll down for a printable version of this recipe
Yield: 16 bars
Prep time: 35 minutes
Cook time: 1 hour 45 minutes
Total: 2 hours 20 minutes
1 pie pumpkin
2 Tablespoons coconut oil
Herbs & crushed garlic (optional)
Salt
For the cookie crust:
1/2 cup all-purpose or gluten-free flour
1/2 cup ginger snap cookies, crushed
1/3 cup powdered sugar
1/2 cup softened butter
For the filling:
15oz Pie pumpkin, roasted & scooped
12 oz evaporated milk
1/2 cup maple syrup or granulated sugar
2 teaspoons pumpkin spice or 5-spice
1/2 teaspoon salt
2 large eggs
1. Preheat the oven to 400 degrees F.
2. Cut the pumpkin in half or into quarters depending on the size, scoop out the seeds and puncture the skin several time with a fork.
 3. Rub the pumpkin with oil and season. Apply herbs and garlic and roast the pumpkin cut side down on a tray for about 20-30 minutes or until the flesh is soft.
 4. Drop the oven temp to 350 degrees and remove the pumpkin.
5. Allow it to cool and scoop the flesh leave the skin behind. I like to roughly chop the scooped flesh so that it isn’t too stringy.
6. In a small bowl, combine all of the cookie crust ingredients and blend with a fork until all combined and looks crumbly.


7. Put the crust mixture into an 8x8 pan lined with parchment and press the crust down into the bottom of the pan into an even layer, cook the crust for about 15 minutes in the oven until slightly browned.
 8. While the crust is cooking, make the filling by whisking together the pumpkin, evaporated milk, maple syrup, spices, salt, and eggs until smooth.

9. When the crust is done, allow it to cool for 10 minutes then pour the filling on top and return to the oven for 50 minutes to 1 hour or until the filling has set with a slight jiggle in the center.

 10. Let cool completely. Slice into bars and serve.

These bars would make a great dessert for your Thanksgiving table, but if you are feeling a bit overwhelmed by the holiday meal, let our chefs handle dessert for you. Order Thanksgiving pies to be picked up at Lincoln Square on the Tuesday or Wednesday before the holiday. Choose from our famous Apple Pie or classic Pumpkin Pie or both!
If you could use some direction on making the holiday feast and ensure your success, whether it's your first time cooking Thanksgiving or your 50th, don't miss these upcoming classes:
- Thanksgiving Crash Course Demonstration Saturday, November 16 10am
- Hands-On Thanksgiving Workshop Saturday, November 23 10am
- Virtual Thanksgiving Crash Course Demonstration Sunday, November 24 10am
- Hands-On Vegetarian Thanksgiving Monday, November 25 6pm
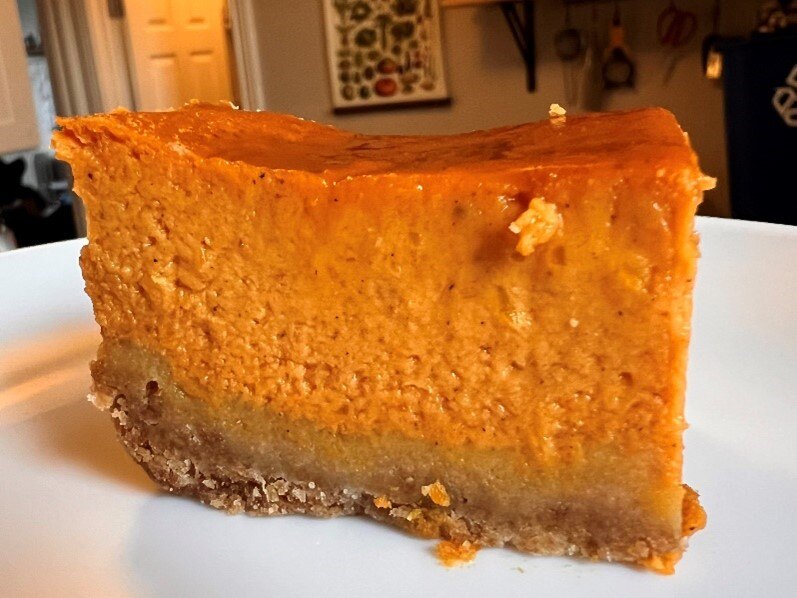
Ginger Cookie Crust Pumpkin Bars
Ingredients
- 1 pie pumpkin
- 2 Tablespoons coconut oil
- Herbs & crushed garlic (optional)
- Salt
- 1/2 cup all-purpose or gluten-free flour
- 1/2 cup ginger snap cookies, crushed
- 1/3 cup powdered sugar
- 1/2 cup softened butter
- 15oz Pie pumpkin, roasted & scooped
- 12 oz evaporated milk
- 1/2 cup maple syrup or granulated sugar
- 2 teaspoons pumpkin spice or 5-spice
- 1/2 teaspoon salt
- 2 large eggs
Instructions
- Preheat the oven to 400 degrees F.
- Cut the pumpkin in half or into quarters depending on the size, scoop out the seeds and puncture the skin several time with a fork.
- Rub the pumpkin with oil and season. Apply herbs and garlic and roast the pumpkin cut side down on a tray for about 20-30 minutes or until the flesh is soft.
- Drop the oven temp to 350 degrees and remove the pumpkin.
- Allow it to cool and scoop the flesh leave the skin behind. I like to roughly chop the scooped flesh so that it isn’t too stringy.
- In a small bowl, combine all of the cookie crust ingredients and blend with a fork until all combined and looks crumbly.
- Put the crust mixture into an 8x8 pan lined with parchment and press the crust down into the bottom of the pan into an even layer, cook the crust for about 15 minutes in the oven until slightly browned.
- While the crust is cooking, make the filling by whisking together the pumpkin, evaporated milk, maple syrup, spices, salt, and eggs until smooth.
- When the crust is done, allow it to cool for 10 minutes then pour the filling on top and return to the oven for 50 minutes to 1 hour or until the filling has set with a slight jiggle in the center.
- Let cool completely. Slice into bars and serve.
